Easy No-Knead Artisan Bread: Bakery-Style Loaves at Home
Imagine the irresistible aroma of freshly baked bread wafting through your kitchen, a golden-brown loaf with a crackling, rustic crust and a soft, airy interior. What if we told you this bakery-quality delight could be yours with minimal effort, no complicated steps, and – best of all – no kneading? Welcome to the world of easy no-knead
artisan bread recipe! This foolproof method is set to transform your home baking, delivering stunning results that will impress even the most discerning palates. Forget the myth that gourmet bread requires hours of grueling work or a professional baker's touch; with just a handful of basic ingredients and a little patience, you're on your way to homemade bread nirvana.
This article will guide you through crafting a magnificent artisan loaf that boasts a satisfying chew, a wonderfully rustic crust, and a deep, complex flavor profile. Whether you're a novice baker taking your first steps or a seasoned pro looking for a simpler approach, this no-knead
artisan bread recipe is designed for success. We'll demystify the process, share invaluable tips for achieving that coveted craggy top and perfect crust, and even show you how to get incredible results without a Dutch oven. Get ready to elevate your lazy lunches, sophisticated dinners, and everyday breakfasts with the sheer joy of homemade artisan bread.
The Magic Behind No-Knead Artisan Bread: Simplicity Meets Flavor
The secret to this incredible bread lies not in strenuous kneading, but in time. Unlike traditional bread recipes that rely on vigorous mixing to develop gluten, the no-knead method leverages a long, slow fermentation process. By allowing the dough to rest for an extended period, typically 12 to 18 hours, the enzymes in the flour naturally break down complex carbohydrates into simpler sugars, while the gluten strands gently organize themselves. This passive development creates a robust gluten network without any manual effort from you.
What does this mean for your bread?
- Deep, Complex Flavor: The extended fermentation allows more nuanced flavors to develop, resulting in a loaf far richer and more aromatic than quick-rise breads.
- Chewy, Open Crumb: The slow process encourages the formation of larger, irregular air pockets, giving the bread that signature open, chewy interior characteristic of artisan loaves.
- Unbeatable Crust: High hydration combined with the right baking technique (which we'll cover!) produces a wonderfully crispy, golden-brown crust that practically sings when you slice it.
This hands-off approach makes the
artisan bread recipe incredibly forgiving, perfect for busy schedules, and surprisingly rewarding. It’s a testament to the fact that sometimes, the best things come to those who wait – with very little effort in between!
Your Simple 4-Ingredient Artisan Bread Recipe: Getting Started
The beauty of this
artisan bread recipe truly lies in its minimalist ingredient list. You likely already have everything you need in your pantry.
What You'll Need:
- 3 cups (about 360g) All-Purpose or Bread Flour: Bread flour will give you a slightly chewier crumb, but all-purpose works beautifully too.
- 1 ½ teaspoons Salt: Essential for flavor and controlling yeast activity.
- ¼ teaspoon Instant Dry Yeast: Just a tiny amount is needed for the slow fermentation.
- 1 ½ cups (about 360ml) Warm Water: Around 100-110°F (38-43°C) is ideal, but room temperature water works fine for longer ferments.
- Optional: A pinch of sugar (¼-½ teaspoon) can be added to the warm water to help activate the yeast faster, though it's not strictly necessary for this long-ferment recipe.
Step-by-Step Instructions:
- Mix the Dough: In a large mixing bowl, combine the flour, salt, and instant yeast. If using sugar, dissolve it in the warm water first, then add the water to the dry ingredients. Stir everything together with a wooden spoon or spatula until no dry pockets of flour remain. The dough will be very wet, shaggy, and sticky – this is exactly what you want! Do not overmix or try to make it smooth.
- First Proof (Bulk Fermentation): Cover the bowl tightly with plastic wrap or a damp kitchen towel. Let the dough rise at room temperature (ideally 68-72°F or 20-22°C) for a generous 12 to 18 hours. During this time, the dough will roughly double in size, become bubbly, and develop a wonderful aroma. If you want an even deeper flavor, you can let it proof in the refrigerator for up to 3 days after an initial 2-3 hours at room temperature.
- Shape the Dough: Once the first proof is complete, lightly flour your work surface. Gently scrape the dough out of the bowl onto the floured surface. Avoid deflating it too much. Lightly flour your hands. Working quickly and gently, grab a piece of dough from the outside and pull it into the middle, repeating this motion all the way around the dough, gathering it into a rough ball. Flip the dough over so the seam side is down, and gently cup your hands around it, rotating it to create a smooth, taut surface. This helps build tension.
- Second Proof (Final Proof): Prepare a proving basket (banneton) by dusting it generously with flour (rice flour works best to prevent sticking). If you don't have one, line a medium-sized bowl with a well-floured clean kitchen towel. Carefully transfer the shaped dough into the prepared basket or bowl, seam-side down. Cover loosely with plastic wrap or a kitchen towel and let it proof for another 30-60 minutes while your oven preheats.
- Preheat Oven & Dutch Oven: About 30-45 minutes before you're ready to bake, place your Dutch oven (with its lid) into your oven and preheat to 450°F (230°C). Getting the Dutch oven screaming hot is crucial for that fantastic crust.
- Bake the Bread: Once the oven and Dutch oven are fully preheated, carefully remove the hot Dutch oven. Gently tip the dough out of the proving basket onto a piece of parchment paper, so it's now seam-side up. Using the parchment paper as a sling, carefully lower the dough into the hot Dutch oven. Place the lid back on. Bake for 30 minutes with the lid on.
- Crisp the Crust: After 30 minutes, remove the lid from the Dutch oven. Reduce the oven temperature slightly to 425°F (220°C). Continue baking for another 15-20 minutes, or until the crust is a deep golden brown and sounds hollow when tapped.
- Cool Completely: Carefully remove the bread from the Dutch oven and transfer it to a wire cooling rack. This is perhaps the most challenging step, but incredibly important: allow the bread to cool completely for at least 1-2 hours before slicing. Slicing too early will compromise the texture of the crumb.
For a truly foolproof method to master your first homemade loaf, check out our guide on
Foolproof 4-Ingredient Artisan Bread: Easy Homemade Loaf.
Achieving Bakery-Style Perfection: Tips for a Crispy Crust & Craggy Top
The distinct characteristics of artisan bread – its crispy crust, chewy crumb, and beautiful appearance – are often attributed to specific techniques and equipment. Here’s how to achieve them at home:
Why Use a Dutch Oven (and Alternatives)
The Dutch oven is an absolute game-changer for homemade artisan bread. Its thick sides and base provide an incredibly even heat distribution, ensuring your loaf bakes uniformly. More importantly, when the lid is on, it creates a sealed, steamy environment around the dough. This trapped steam is vital because it keeps the crust moist in the initial stages of baking, allowing the bread to fully expand ("oven spring") before the crust sets. This leads to a thinner, crispier crust rather than a thick, tough one.
No Dutch Oven? No Problem!
While a Dutch oven offers the best results, you can still achieve a fantastic loaf without one.
- Heavy-Bottomed Pot with Lid: Any oven-safe, heavy-bottomed pot (like a cast iron casserole dish or even a large stainless steel pot) with a tightly fitting lid can work similarly.
- Baking Sheet with Steam: Place your dough directly on a preheated baking stone or heavy baking sheet. To create steam, place a metal pan on the bottom rack of your oven while preheating. Carefully pour a cup of boiling water into the hot pan just as you put the bread in. Be cautious of the steam! This method provides an initial burst of moisture, though less contained than a Dutch oven.
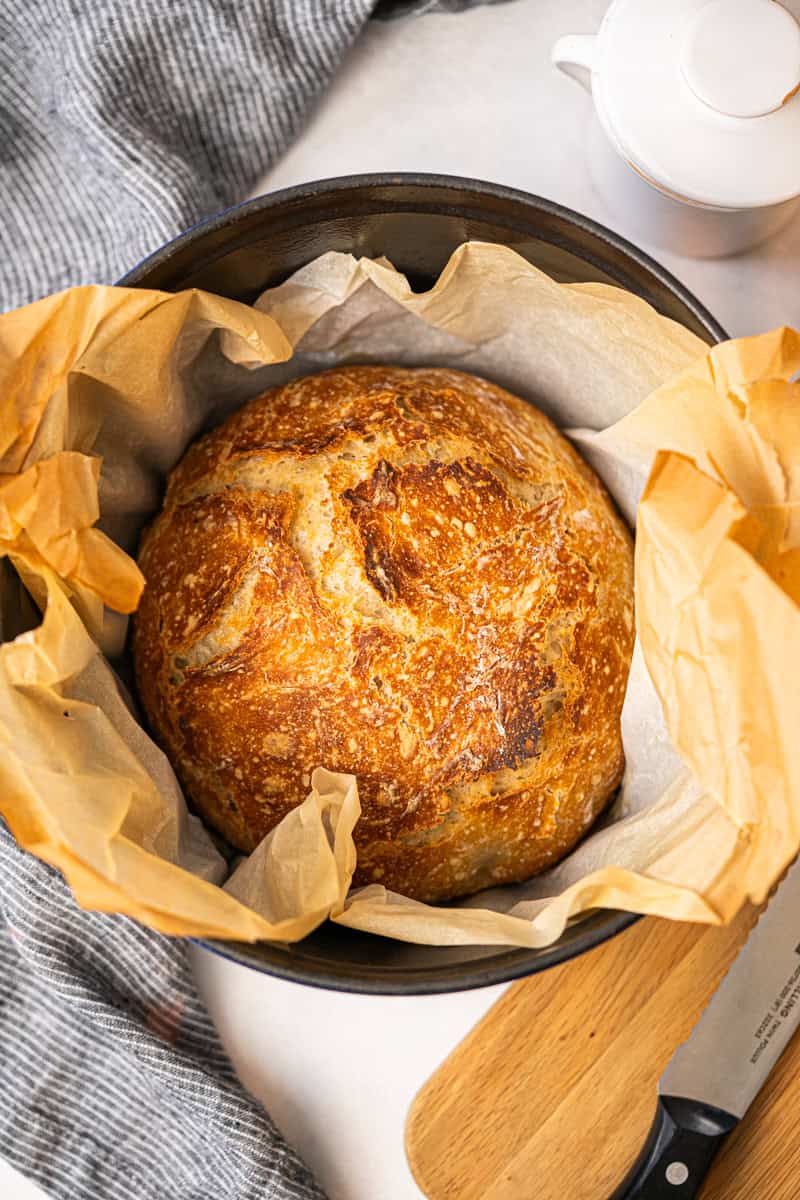
The Secret to a Craggy Top
That beautiful, rustic, craggy top is easier to achieve than you might think and doesn't require slashing the dough with a lame (baker's razor). The trick is in how you place the dough into the Dutch oven:
seam-side up.
When you shape the dough, you'll create a seam where the edges meet. By placing this seam face up in the hot Dutch oven, the bread naturally expands and bursts along these weak points during baking, creating those gorgeous, irregular fissures that give artisan bread its signature rustic look. This natural cracking eliminates the need for precise scoring and yields a truly unique, organic appearance every time. For more in-depth advice on this technique, explore our article:
Unlock Artisan Bread: Perfect Craggy Top & Dutch Oven Tips.
The Role of a Proving Basket (Banneton)
A proving basket or banneton is a traditional tool, typically made of cane, that helps the dough hold its shape during the final proof. It also imparts a lovely spiral flour pattern to the crust. If you don't have one, simply line a medium-sized bowl with a well-floured, clean kitchen towel. The flour prevents sticking, and the towel helps absorb excess moisture, contributing to a better crust.
Patience is Key: Cooling Your Loaf
Resist the urge to cut into your bread immediately after it comes out of the oven! As tempting as the aroma is, the bread is still cooking internally during the cooling process. Slicing too soon will release steam, resulting in a gummy, dense crumb and a less crispy crust. Allowing it to cool completely on a wire rack ensures the internal moisture redistributes properly, giving you that perfect chewy interior and a delightfully crisp exterior.
Serving Suggestions & Why You'll Love It
Once your stunning homemade artisan bread has cooled, it's time to enjoy the fruits of your (minimal) labor! The possibilities are endless:
- Classic with Butter or Jam: There's nothing quite like a thick slice slathered with good quality butter or your favorite homemade jam.
- Dunk in Olive Oil: Serve with a small dish of high-quality extra virgin olive oil, perhaps with a sprinkle of sea salt and freshly cracked black pepper.
- Alongside Soups and Stews: The robust crust and soft interior are perfect for soaking up hearty broths and rich sauces.
- Elevated Sandwiches: Transform an ordinary sandwich into something extraordinary.
- Bruschetta or Crostini: Toast slices lightly, rub with garlic, top with fresh tomatoes and basil for an easy appetizer.
- Garlic Bread: A simple yet delicious way to enjoy leftover bread.
Beyond the versatility in serving, there's immense satisfaction in baking your own bread. The aroma that fills your home, the pride in presenting a beautiful loaf you made yourself, and the incomparable taste of fresh, homemade bread are unmatched. This easy
artisan bread recipe gives you all the rewards of traditional baking with none of the hassle, making it a go-to for quick indulgence or special occasions.
Conclusion
Creating bakery-quality artisan bread at home is not just possible, it's wonderfully simple with this no-knead method. By harnessing the power of time and a few basic ingredients, you can consistently produce loaves with a beautifully crisp crust, a chewy, open crumb, and a deep, satisfying flavor. From the magical transformation of flour and water into a living dough to the irresistible moment you slice into your perfectly cooled loaf, every step of this journey is rewarding. So gather your ingredients, set aside a little time for passive fermentation, and prepare to delight your senses and impress your loved ones with your very own homemade easy no-knead artisan bread. Happy baking!