Foolproof 4-Ingredient Artisan Bread: Your Easiest Path to Bakery-Style Perfection
Imagine a world where the aroma of freshly baked bread fills your kitchen, a loaf with a beautifully golden, crackly crust giving way to a soft, airy interior. Now, imagine achieving this masterpiece with just four simple ingredients and a method so straightforward, it feels almost like magic. Welcome to the world of foolproof 4-ingredient artisan bread, an easy no-knead artisan bread recipe that promises bakery-quality results right in your own home.
For too long, artisan bread has been shrouded in an air of complexity, reserved for seasoned bakers with intricate techniques and specialty equipment. But what if we told you that the secret to a magnificent, rustic loaf lies in its simplicity? This particular artisan bread recipe is a game-changer, stripping away the fuss while retaining all the flavor and texture you crave. Whether you're a complete novice or a seasoned pro looking for an effortlessly delicious option, this method will quickly become your go-to. Get ready to impress your family, friends, and most importantly, your taste buds!
The Magic Behind Your Foolproof Artisan Bread Recipe
What makes this specific artisan bread recipe so exceptional? It’s a harmonious blend of minimal ingredients, minimal effort, and maximum flavor. The beauty lies in its hands-off approach, allowing time to do most of the work for you. The result is a loaf that boasts a perfectly chewy crumb, a robust, rustic flavor, and that enviable crispy crust that sings when you tap it.
Many home bakers shy away from bread making, fearing complicated kneading processes or the need for a stand mixer. This recipe eliminates those barriers. By utilizing a longer fermentation period, the dough develops its structure and flavor without intensive kneading. And while a Dutch oven is often championed for achieving the ultimate crust, we’ll show you how to get fantastic results even without one, proving that delicious homemade bread is accessible to everyone.
Unveiling the Simple 4 Ingredients
The core of this foolproof recipe lies in its incredibly short ingredient list. You likely have these staples in your pantry right now:
- All-Purpose Flour: The foundation of our bread. While bread flour (with higher protein content) can yield a slightly chewier result, good old all-purpose flour works wonderfully here, making it accessible to everyone.
- Warm Water: Essential for activating the yeast and bringing the dough together. The temperature is key – too hot will kill the yeast, too cold won't activate it. Aim for bathwater warm (around 105-115°F or 40-46°C).
- Active Dry Yeast: The leavening agent that gives the bread its rise and distinctive airy texture.
- Salt: Not just for flavor! Salt is crucial for controlling yeast activity and strengthening the gluten structure, contributing to the bread's overall texture and crust development.
That's it! No fancy emulsifiers, no sugar (which can be found in some recipes but is truly optional here), just the fundamentals working in concert to create something truly spectacular.
Step-by-Step Guide to Your Easy Homemade Loaf
Ready to get your hands a little floury? Here’s a detailed breakdown of how to bring your perfect artisan loaf to life. This method emphasizes simplicity and relies on time for flavor and texture development, making it incredibly forgiving.
1. Activation and Mixing (The No-Knead Magic)
- In a large mixing bowl, combine the warm water and yeast. Let it sit for 5-10 minutes. You should see it become foamy and bubbly, indicating the yeast is active and ready to work. This is a crucial step – if it doesn't foam, your yeast might be old or the water temperature was off.
- Add the flour and salt to the bowl with the activated yeast mixture.
- Using a wooden spoon or a sturdy spatula, mix everything together until just combined. The dough will be shaggy and sticky – do not worry about kneading at this stage. The goal is simply to ensure all the flour is hydrated.
Pro Tip: For a slightly different texture, some bakers prefer a brief kneading phase. If you opt for this, once combined, you can knead the dough on a lightly oiled surface for 5-10 minutes until smoother and more elastic, or use a stand mixer with a dough hook. However, the true beauty of this "foolproof" recipe lies in its no-knead simplicity, relying on time for gluten development. For more on this, check out our article: Easy No-Knead Artisan Bread: Bakery-Style Loaves at Home.
2. First Rise (Bulk Fermentation)
- Lightly oil the inside of your mixing bowl or transfer the dough to another oiled bowl. This prevents sticking.
- Cover the bowl tightly with plastic wrap or a damp kitchen towel.
- Allow the dough to rise in a warm, draft-free place for 12-18 hours (or even longer, up to 24 hours). The longer the rise, the more complex the flavor. The dough should at least double in size and be dotted with bubbles. This slow fermentation is where the magic happens, developing flavor and structure.
3. Shaping and Second Rise (Proofing)
- Once the first rise is complete, gently tip the dough out onto a well-floured surface. Handle it as little as possible to preserve the air bubbles.
- Gently shape the dough into a round loaf. The traditional method involves pulling the edges of the dough from the outside towards the center, rotating the dough as you go, until it forms a tight ball. Flip it over so the seam is on the bottom.
- Transfer the shaped dough, seam-side down, into a well-floured proving basket (banneton) or a bowl lined with a floured kitchen towel. This helps maintain its shape and imparts a lovely flour pattern.
- Cover the dough again and let it rise for a second, shorter period (proofing) for 30-60 minutes, or until it looks puffy.
- Meanwhile: About 30 minutes before the second rise is complete, place your Dutch oven (with its lid) into your oven and preheat the oven to 450°F (230°C). This is critical for getting that intensely crispy crust.
4. Baking for that Perfect Crispy Crust
- Carefully remove the preheated Dutch oven from the oven (it will be incredibly hot!).
- Gently invert the dough from the proving basket or bowl directly onto a piece of parchment paper. The goal is for the seam-side to now be facing UP. This "seam-side up" technique is the secret to achieving that beautiful, craggy, rustic top without needing to slash the bread with a knife.
- Using the parchment paper as handles, carefully lower the dough into the hot Dutch oven.
- Place the lid back on the Dutch oven and bake for 30 minutes. The trapped steam creates the perfect environment for a thin, crispy crust.
- After 30 minutes, remove the lid and continue baking for another 10-15 minutes, or until the crust is deeply golden brown and sounds hollow when tapped.
- Carefully remove the bread from the Dutch oven and transfer it to a wire cooling rack.
- Allow the bread to cool completely (at least 1-2 hours) before slicing and serving. This step is essential for the internal texture to set properly and prevent a gummy crumb.
Mastering Your Artisan Bread: Essential Tips & Tricks
While this artisan bread recipe is designed to be foolproof, understanding a few key principles can elevate your baking even further.
The Dutch Oven Advantage (and Alternatives)
A Dutch oven truly is a bread baker's best friend. Its thick sides and base ensure incredibly even heat distribution, preventing hot spots that can lead to unevenly baked bread. More importantly, when covered, it creates a sealed, steamy environment. This steam is crucial for a thin, crispy crust and allows the bread to expand fully before the crust hardens. For an in-depth look at this, read our article: Unlock Artisan Bread: Perfect Craggy Top & Dutch Oven Tips.
No Dutch Oven? No Problem! You can still achieve great results:
- Heavy-Bottomed Pot with a Lid: Any oven-safe pot with a tight-fitting lid will work similarly to a Dutch oven.
- Baking Stone or Heavy Baking Sheet + Steam: Preheat a baking stone or heavy baking sheet in the oven. When ready to bake, transfer the dough onto the hot stone/sheet. To create steam, place a pan of hot water on the bottom rack of your oven for the first 15-20 minutes of baking.
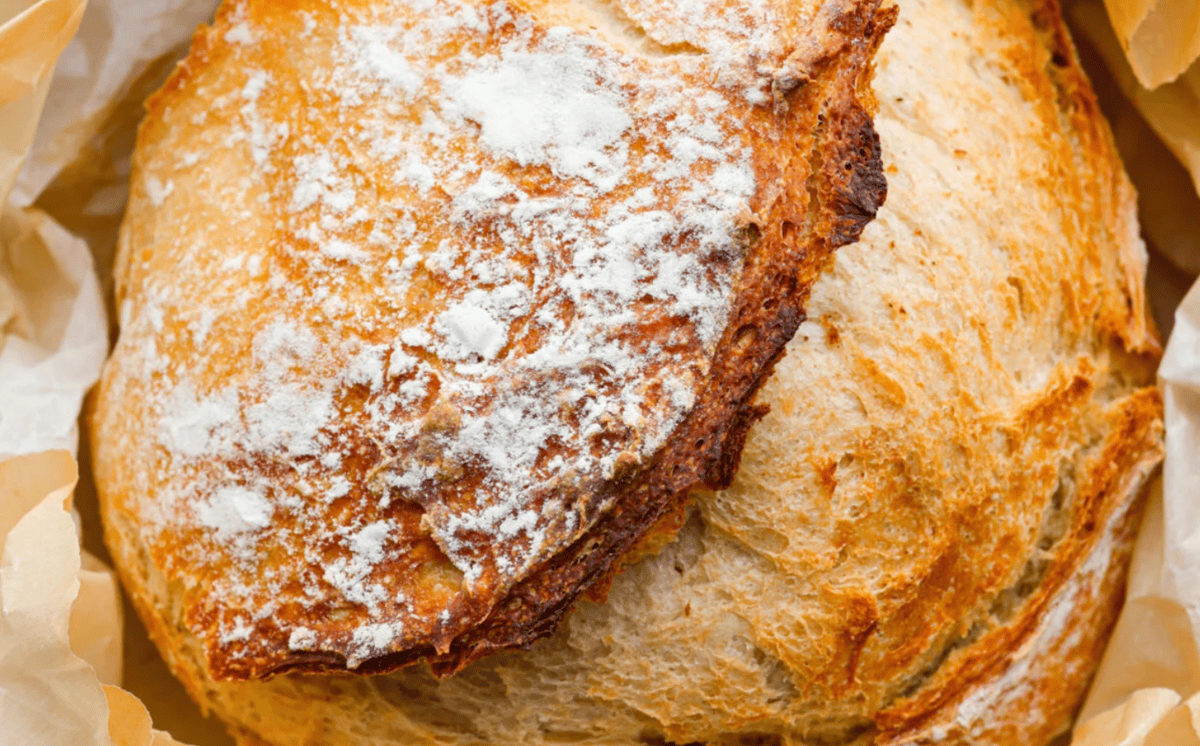
Achieving the Craggy Top Without Slashing
The secret to that coveted, rustic, craggy top that looks like it came straight from a European bakery lies in the "seam-side up" baking method. By placing the seam of your shaped dough facing upwards into the hot Dutch oven, the natural expansion of the bread during baking will cause the seam to split and burst open in beautiful, unpredictable ways. This eliminates the need for precision scoring with a lame or knife.
Proofing Perfection
Understanding when your dough is perfectly proofed is crucial. For the first rise, look for the dough to visibly double (or even triple) in size and become bubbly. For the second rise, the dough should look puffy but not overly expanded. A simple "poke test" can help: gently press a floured finger into the dough. If the indentation springs back slowly, it's ready. If it springs back immediately, it needs more time. If it collapses, it's over-proofed.
Cooling is Crucial
Resist the urge to slice into your beautiful loaf right out of the oven! Cooling your bread completely on a wire rack allows residual heat to escape and moisture to redistribute evenly throughout the crumb. This process is essential for developing the final texture, preventing a gummy interior, and allowing the flavors to fully mature. Patience truly pays off here.
Beyond the Basics: Enjoying Your Homemade Artisan Loaf
Once cooled, your homemade artisan loaf is a canvas for culinary delight. The possibilities are endless:
- Simple Pleasure: Slice it thick, slather it with good quality butter, and enjoy with a sprinkle of sea salt. This is pure, unadulterated bliss.
- Lazy Lunches: Perfect for dipping into olive oil and balsamic vinegar, or serving alongside soups, stews, and vibrant salads.
- Breakfast Delight: Toast slices and top with your favorite jam, marmalade, or avocado and a poached egg.
- Gourmet Sandwiches: Elevate your sandwich game with thick slices of this rustic bread, piled high with fresh ingredients.
To store your bread, keep it at room temperature in a paper bag or a bread box for up to 2-3 days. For longer storage, slice and freeze. Simply toast directly from frozen for a quick treat.
Making artisan bread at home doesn't have to be an intimidating endeavor. With this foolproof 4-ingredient artisan bread recipe, you've unlocked the secret to consistently baking stunning, delicious loaves that will rival any bakery. Embrace the simplicity, trust the process, and prepare to be amazed by the incredible results. Happy baking!
